![]()
RASTRAC REST API
Documentation
Monday, January 28, 2019
Contents
RASTRAC as an API-First Application
REST API Documentation via Swagger
Prerequisites
A username and password is required to access the RASTRAC REST API. If you do not have a username and password, please contact your sales representative.
RASTRAC as an API-First Application
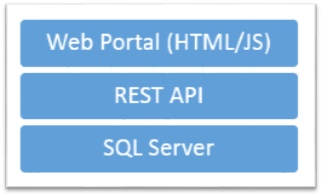
Architecturally, RASTRAC is built API-first. This means that RASTRAC is built in layers - all data and operations are available over its REST API. The RASTRAC DS Web Portal is actually built on top of this API. In the RASTRAC DS Web Portal, we don't use any shortcuts - 100% of the data and operations that you can see and perform in the RASTRAC DS can be performed over the REST API.
The RASTRAC REST API is designed:
1. To be friendly and easy to figure out.
2. To be session-less – each request is independent of previous requests
3. To be comprehensive – 100% of the actions that you perform in the RASTRAC DS UI can be performed via the API.
REST API Documentation via Swagger
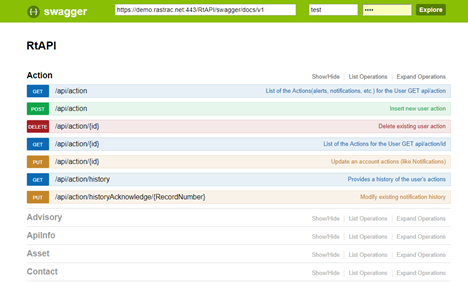
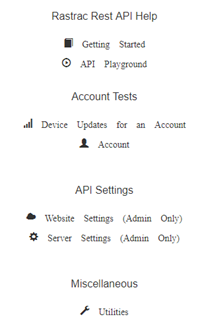
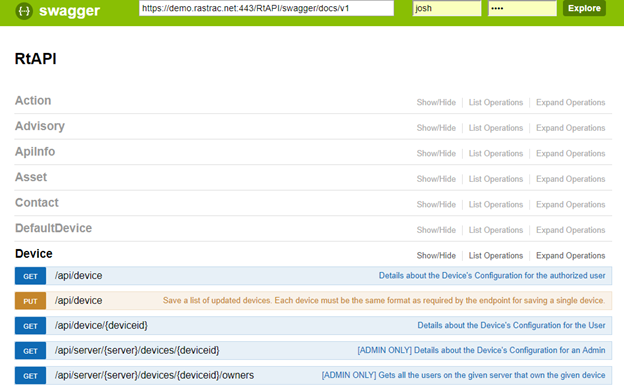
The RASTRAC API includes the default Swagger UI for displaying the API documentation in a nice human readable way. To browse that UI just open your browser and go to [RastracApiUrl]/swagger/. You can also get to the Swagger UI by going to the root API url [RastracApiUrl]/ and clicking the API Playground link.
To access most endpoints, you will need a username and password. These credentials can be entered near the top of the page. Some endpoints will require admin privileges. You must have admin credentials to access these endpoints.
Documentation, examples, and utilities are also available at the root URL [RastracApiUrl]/ (e.g. https://demo.rastrac.net/rtapi/).
HTTP Commands
The RASTRAC API uses the following HTTP Verbs
· GET – query information from the API
· POST – add a new item to an API endpoint or otherwise send data to the endpoint
· PUT – update an existing item
· DELETE – delete an existing item
HTTP Status Codes
Responses can include one of the following HTTP status codes, in addition to content data. Status codes are not part of endpoint descriptions because the implementation follows the HTTP standard for reporting status. But, the documentation notes status codes with special significance for the endpoint, or whose RASTRAC API software specific cause differs from the standard.
See the Hypertext Transfer Protocol -- HTTP/1.1, Status Code Definitions standard for the complete list of status codes and their meaning.
· 200 - Request completed successfully
· 401 - Authentication failure, invalid access credentials
· 404 - Requested endpoint does not exist
· 500 - Unspecified internal server error. See response body for details
The RASTRAC Rest API is designed as a restful interface. Every request is independent and does not require any specific sequence. An authorization header must be included with each request. The RASTRAC API uses Basic authentication.
Basic Authentication Header
In order to make calls to the RASTRAC REST API, you must include the Authorization header as part of the request. The Authorization header should be formatted for Basic authentication. This means that the value for the Authorization header will be “Basic token”. The token is a your “user:password” encoded as Base64. On the main RtAPI documentation page, you can find a Utilities link. This will take you to a page that will help you create the basic authentication token.
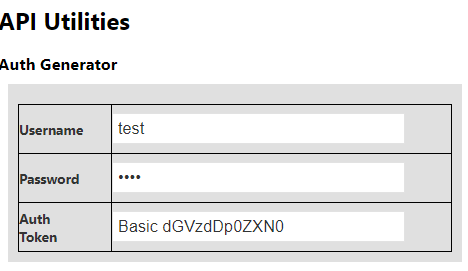
The Authorization header should look similar to the following in the HTTP request.
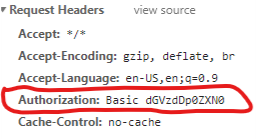
Request structure
All requests have a basic structure. They start with “/API” this directs the request to the rest API controllers. After that is “/controllerName”, this will define which controller will process the request. Optionally there will be additional data. Use the controller name to see from the help documentation what needs to be provided and what will be returned.
EXAMPLE
https://demo.rastrac.net/rtapi/api/Device/
The controller is “Device”. This is an http GET operation, so looking in the API playground we would look for Device and the GET function. There are several GET functions, so we look for the one without any parameters (the first one below).
If you click the GET command it will reveal more information about the request and what is returned. And you can try out the command by clicking the Try it out! button. Clicking the Try it out! button will make an API request to the RASTRAC API, using the entered credentials. The Response Body will contain the information returned by the RASTRAC API. The Response Code will contain the HTTP Status code indicating if the request was successful or not.
JavaScript Examples
JavaScript examples of using the RASTRAC API are at Examples